Showing posts with label Lunch Box Love Notes. Show all posts

Friday, August 13, 2010

Tic Tac Toe Lunch

This morning I had planned to make a "Tic Tac Toe" themed lunch for my daughter for school.  I was just too tired to put it together last night so I set my alarm to get up a little early and prepare it this morning....only that's not what happened.  Somehow when the alarm when off on my trusty cell phone (which I had set to a peaceful and soothing ringtone that is not suited to waking  people like me up)  I grabbed the phone, turned it off, and went right back to sleep...for like an hour.  When I woke up it was apparent that there would be no time for showering but I still managed to throw together a lunch that was somewhat like what I had imagined.  You'll have to excuse the hurried pictures.  It was some kind of miracle that I took any pictures at all :)  So, here it is:

Everything is more fun when it's a game right!?  So, I decided to make this lunch into a tic tac toe game.  The first step is to make the playing board. Grab a sheet of self sticking laminate (I use this stuff alot) ,or  you could use clear contact paper too, and draw a Tic Tac Toe board on it with a Sharpie. 

Now, peel off the backing and stick the game board you just made to the inside of the lid of the lunchbox.

  Add a dry erase marker and you have a game board/lunch box all in one.  It's something fun to do with friends while they are eating and chatting.  Because I was in a hurry I scribbled out a note on one of the sandwich bags.  It was still cute but would have been cuter if I would have prepared it in advance...so I made one for you so that your kids' lunch can be more fashionable :)

CLICK HERE FOR PRINTABLE TIC TAC TOE LOVE NOTE

Next, I used "X" and "O" cookie cutters to cut the sandwich. 


Then I made little O's by scooping out the center of cucumber slices.  I also did a mad dash and cut the cheese slices into X's.

And for dessert, what else but TIC TAC's :)  Don't you just love themes?

I also had this cute little party favor in my School Lunch Kit so I added it in just cuz it was kinda tic tac toey. 

My daughter looked excited as she ran out the door.  Hopefully she will find a friend to play TIC TAC TOE with and together they can eat TIC TACS and smile their way through lunch time.

And my son.....well, he was jealous of the cool lunch so he ate this for breakfast. 

Thursday, August 12, 2010

Lunch Box Love Notes: Scratch Off Cards

For the first day of school I wanted to send a note in my daughter's lunch that would really make her smile.  I wanted something more than just a little slip of paper that said "I love you". I was going for the AWESOME FACTOR. :) So, when I stumbled upon this concept I was pretty darn excited.  (Things like this make me feel like a kid on Christmas morning)  The idea is a scratch off love note.


You've probably seen those "scratch and win" game cards or recieved a coupon in the mail where you could scratch off the little metallic circle with a penny to reveal how much you will save at the sale.  When I get these things in the mail I always scratch every single one of the sections off even though I have no intention of using the game/coupon. Why do I do this?  Because it's so irresistable.  You just want to find out what's hiding behind that little circle and it's so satisfying to scratch it off and find out.  OK, maybe you don't feel the same enthusiasm about scratch off coupons as I do.  But, I guarantee your kids will.

And here's all you have to do to create that excitement combined with a love note in their lunchbox.

STEP 1:
 Print off the card. 

Here's a blank one if you want to write in your own fortunes or add them in a photo editing program.


STEP 2:
Laminate it (you can use self sticking laminate sheets from your Local Target or Wal-Mart if you don't have access to a laminating machine)

STEP 3: 
 Mix up your paint solution (2 parts gray paint + 1 part dish soap)
NOTE: I tried this without the dish soap and it didn't work nearly as well.  Tempera paint and dish soap= greatness!

I just used CRAYOLA washable tempera paints (a little black mixed with white) that I had on hand
 Paint over the little circles.


STEP 4:
Include a popsicle stick if you like for scratching off and you're ready to treat your little kiddo with a super special love note


Once the paint is dry your card is done.  Send it in thier lunchbox, leave it on their bed, mail it to them, whatever you please.


Wasn't that fun!?
And since it's just so much fun I made a few other templates too. I included some with blank circles so you can put it in your photo editing program, add your own words, and print! If you don't have a photo editing program ( I just use PICASA, it's a free download) you can also just write in the words before you laminate and that will work just as well.
Click below for the printable version of:


Click below for the printable version of:


P.S.- When my kids saw me making these I got the "AWESOME!" reaction I was hoping for.  It was really hard for them to resist the scratching until they got the notes in their lunches :) 

Monday, August 9, 2010

School Lunch Kit

School is almost upon us which means that it's almost time to resume the daily ritual of packing school lunches. Lunch can be just a box full of food, or it can be something special that is looked forward to every day. A lunch packed by mom is full of potential to brighten a kids' day and leave them feeling loved.
Occasionally I have some really creative lunch idea that I can spend a little extra time on and it will really WOW the kids.  ( I will share some of these ideas with you later this week) But, as reality would have it , life is busy  and school mornings are often rushed.  But, I still want my kids to open their lunch boxes and know that their mom cares everyday.

So, this year I'm prepared.  I have a little secret stashed away to help me produce smile inducing lunches even on the busiest of mornings.  Ready for it?  Creating one of these kits will instantly make you feel like a better mom and will create months and months of happy (at least at lunch time) children.

Here it is : The busy mom's SCHOOL LUNCH KIT
I would make those words sparkly and gleam if I had the technical know how to do that :)

For mornings when your creative juices, time, energy or resources are running low this little kit will provide the tools to make ANYTHING that you pack into that lunch box seem special.  It's all about presentation.  Gather the following items, place them in a little container in your pantry (I used a plastic file box) and you'll be ready.  Here's what's in my kit:

PARTY NAPKINS
(an assortment of napkins with fun designs or your child's favorite characters on them)

SANDWICH CUTTERS
(I found some awesome sanwich cutters in the dollar bins at Target and at Wal-Mart.  Of course, you can always just use regular cookie cutters too.  Any sandwich looks more fun and appealing if its cut into shapes.  Keeping all the sandwich cutters in your lunch kit makes this a no-brainer hit in the mornings)


STICKERS
(Add these to a little note you write or to your ziploc baggies, etc. for extra fun)

FUN PACKAGING
(I found plastic baggies with hearts, camo, Tinkerbell, Toy Story, etc. at my local Target.  No work required.  Instantly happier than a plain bag.  Also looked for colored containers or any other fun and festive way to package food and keep it on hand)


PRIZES
Your kids will love you for this.  It's like a Happy Meal with a prize.  Go to the party section of the store where you can buy cheap favors for kids (please don't buy things that make noise or that your child will want to throw or bounce :) But there are some cool little trinkets that are very inexpensive (like 4 for a dollar or less).  Every once in a while throw in a prize with their lunch.  Add some for their friends if your feeling generous and the whole class will love you too.

PRE PRINTED NOTES AND JOKES
I found some cute printable lunch notes on a site called Alphamom, and I printed out some
Ready to Print Custom Lunch Box Notes from Skip to my Lou

There are some truly goofy kids jokes online.  Have some on hand already cut and ready to go into the lunch box for busy days.  Here's a little sampling:

What goes HA HA HA PLOP?
Someone laughing their head off!

Oh, you know you loved it.  Click here for a page of printable jokes

PAPER, MARKERS, and FOOD MARKERS
Writing a little note in thier lunch can make their day.  If you want to do something different, fun, and easy, try using food writer markers (buy them at Michael's or anywhere that carries Wilton products) and write a note on their banana, apple, orange, or any other food that you can find.

And there you have it, the tools to make any lunch a great lunch.  But whatever you do DON'T FORGET THE LOVE NOTE!  It's the most important part of any lunchbox meal. Happy school year mom !:)

More fun lunch ideas to come this week.

Friday, August 6, 2010

Lollipop Lunches

Lunch around my house has become quite ho-hum these days.  I don't mean to complain because it is certainly a no brainer to make peanut butter sandwiches or quesadillas every single day of your motherly life.  But, sometimes it would be nice to make something that looked a little more appealing and made everybody smile at the same time.  Plus, school is approaching quickly and I'm looking for an occasional alternative to preparing one hundred and eighty peanut butter sandwiches for lunchboxes this year.  So, today we tried our first cool school lunch/fun lunch at home idea.  Today we made....LOLLIPOP LUNCHES!  Because, as my children tell me, everything tastes better on a stick :)

Here's the menu:
Lollipop Sandwiches
Cucumber Lollipops
Grape Lollipops
Cheese Lollipop
And, of course, for dessert....a real lollipop

And here's what you do:
To make a lollipop sandwich you first have to flatten your bread a little with a rolling pin.

Then, cut off the crust for beauty :)

Put your toppings on. 
We tried peanut butter, strawberry cream cheese and jam, ham and cream cheese, and a regular ham and cheese.  You just have to have a fairly thin layer of toppings so that you can roll your bread into a little pinwheel.


  I though I would need a sticky spread to hold this together but surprisingly the plain ham with cheese stuck together just fine once I got the toothpick in it.

Once you've got your toppings on, start at the end of the sandwich and roll it up.  It will look like this:


You can refridgerate it for a while if you want it to maintain a perfect and firm shape...but who am I kidding, I have a very short attention span and on a school morning there is no time for such things.  So, just cut it into cute little round slices and stick a toothpick in it so it looks like a lollipop.  My children were beaming when they saw these things. 


Now, stick some grapes on a toothpick and VOILA, grape lollipops. 

Cucumbers make nice round sucker like shapes

and cheese can be cut into cubes or if you have a little circle cutter that's great too.  My kids loved helping with this LOLLIPOP feast and devoured very last bite. 

Follow up with a real life lollipop and you get the mom award for the day.  Pack it in your kiddos lunch box...it's so much cooler than a plain ol' sandwich with grapes.

Thursday, April 8, 2010

Secret Decoder Cookies

You know when you see the words SECRET, DECODER, and COOKIE together you already want to try this.  I know you do.  At least I did.  When I saw this online I had to try it out...and give it my own little twist to make it really intriguing for my oldest child too.  It had great lunch box love note potential. It's really quite easy but there are a few tricks that I found out on the way.  Ready, let's make em'

First, gather your supplies. You'll need:
Your favorite sugar cookie recipe
and the ingredients to make them

 (Here's mine, they are super soft and delicious)

A bag of red,clear, hard candies. 
Jolley Ranchers were reccomended and I think they would actually work best. They are more transparent that what I ended up with. But, I couldn't find packages that had ONLY red at my local Wal-Mart.  So, I bought a package of red cinnamon discs instead and I actually quite liked the cinnamon taste.


Two cookie cutters of the same shape that fit inside one another (or you could use jars, or cups, or whatever you have that will make a nice ring shape after you use both cutters...you'll see below)


Rolling Pin

Hammer
Large Ziploc Bag


My Secret Decoder Messages


First, unwrap all of your hard candies and put them in a large ziploc bag.  Seal the bag and place it on a heave cutting board.

Now, if you are feeling really brave or really generous or really illogical, give your child a hammer and tell him that he gets to break those candies to smitherines.
Try to read his facial cues to see if he is going to be dangerous...does he look like he will be dangerous?
 Now would be a good time to go over safe hammering rules and the importance of retaining all fingers and eyes during the process...or maybe you could do the hammering.  But, he will think it's so fun.
You can use the rolling pin to crush the pieces some more.
Now once those candies are all crushed you have what my son affectionately calls "DECODERANT".  Sounds like deodorant but it's so much more delicous.  And, it will soon be the "DECODER" part of the cookie.
Make your sugar cookie dough and roll it out to about 1/4".
Now get out your two cookie cutters.  Or, in my case, a jar and a measuring cup.
All that matters is that the two circles fit nicely inside each other to make a ring shape.

Cut our your ring shapes
and place them on a COOKIE SHEET THAT HAS BEEN COVERED WITH TINFOIL AND GREASED.  Do not skip the greasing.  See this pan. 
 It's not greased.  It didn't go well. Hard candy can be very sticky.  Which bring us to the next step.  Spoon the decoderant into your little sugar cookie rings. 
But don't put too much in.  If you fill the rings to the top you will end up with a very thick decoder window that is hard to see through.  See, it's tasty but it's a wall, not a window.
Take it easy on the DECODERANT...just enough that it will melt and create a very thin window.
Now put it in the oven at 350 degrees for 9-10 minutes and watch it transform into this:

LET THEM COOL COMPLETELY!
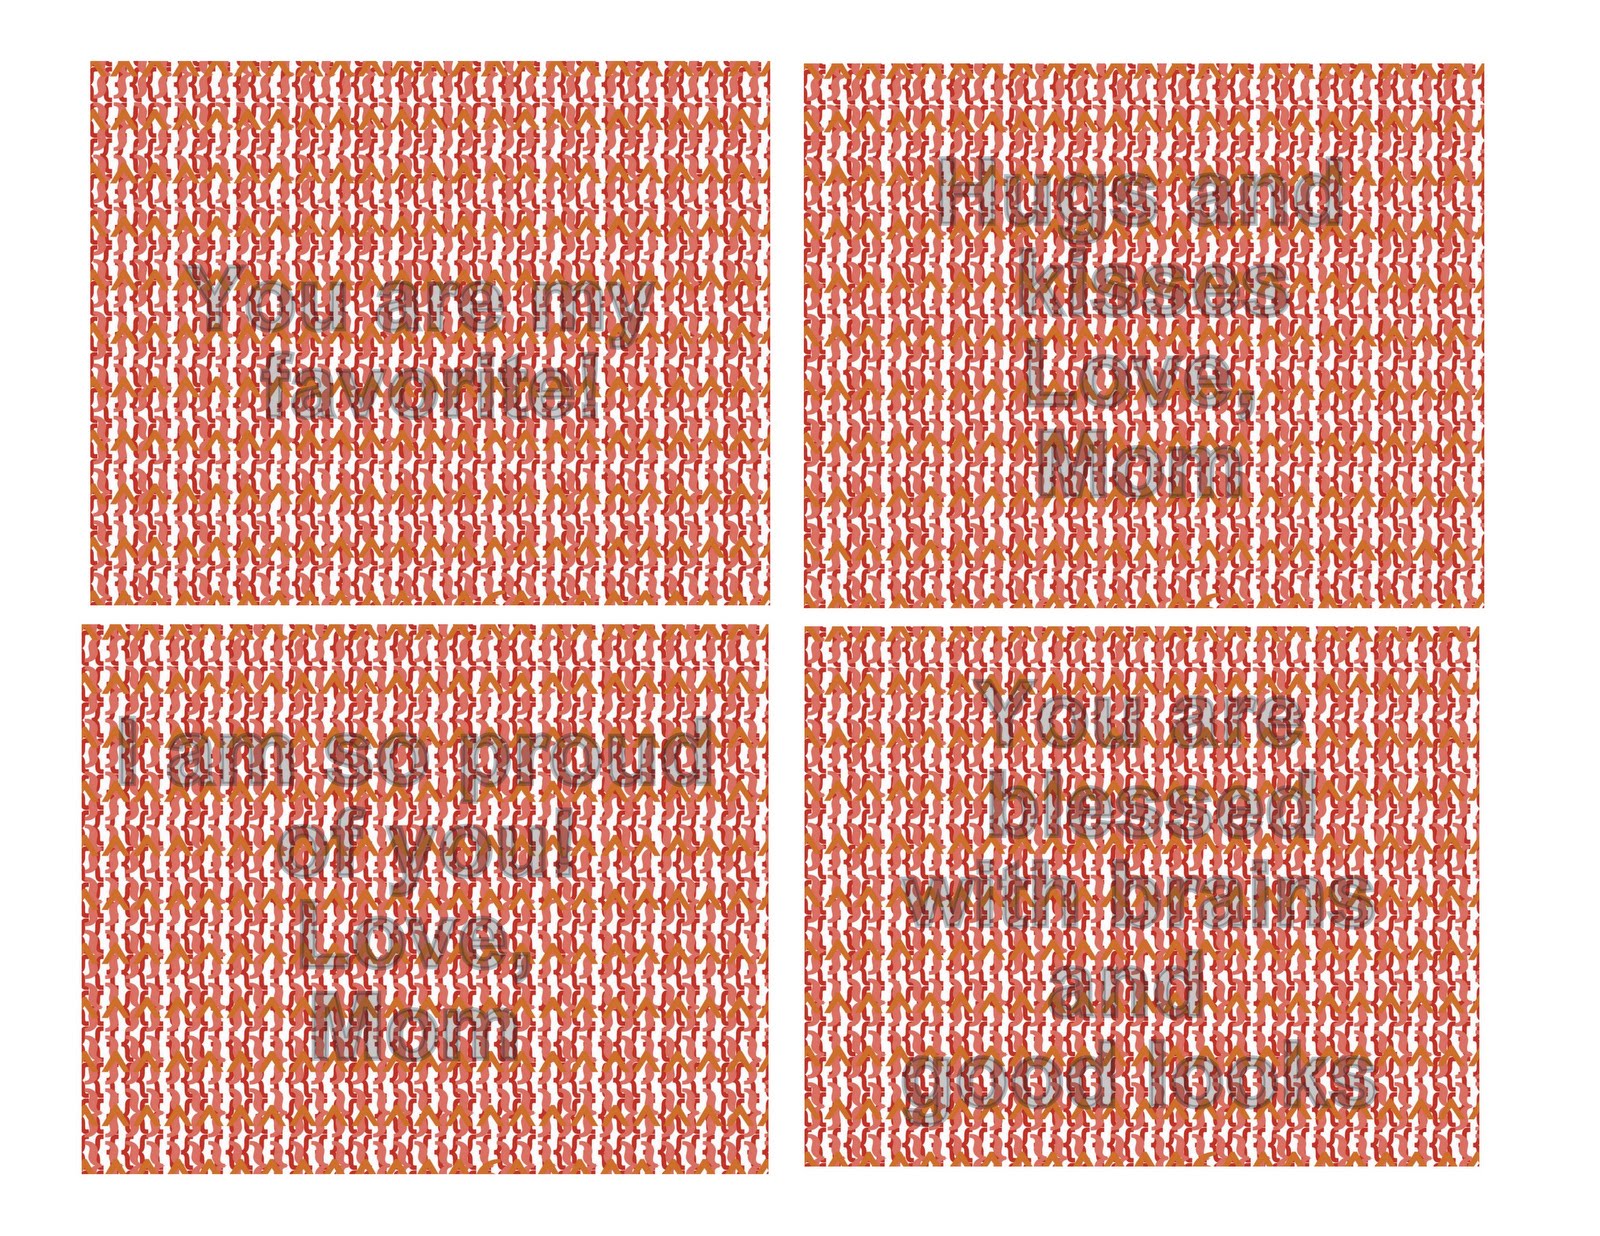
And now you're ready to decode.  The concept is that the message in written is light blue but surrounded by lots of print that is in red, orange and pink which makes it hard to read the message.  The decoder is placed over the message and kind of drowns out all the "noise" so you only see the message written in light blue.  Like this:

I sent the "coded" messages to school with my daughter today along with two decoder cookies.  She came home saying that everyone at her lunch table thought it was so cool and that they all took turns using the decoder and reading the messages. To which I responded "You passed your cookie around the table and everyone touched it and then you ate it?"  To which she responded with a huge grin and said "Yeah, they LOVED IT!" And I felt grossed out and pleased at the same time.
So, mission accomplished.  A lunchbox love note that made everyone happy and satisfied their sweet tooth too.

P.S.-A note on storing these cookies.  The decoder windows do not like heat or humidity.  They became sticky and foggy when I sealed them all in a plastic bag together and put them on top of my fridge. So, if you aren't going to use them immediately I would at least reccomend that you:

1-Don't store in an air tight container that will hold in all the moisture.  Maybe it's just the humidity here but it left them way too moist.  You want that red window to stay dry.
2-Don't stack them on top of each other
3-Keep them cool

But, all the cookies were gone quickly so you may not have to worry about that at all.
And here's some decoder messages just for fun.
CLICK HERE FOR THE PDF PRINTABLE VERSION.

And, here's a blank one if you want to make your own.  Use light blue lettering.  (My lettering was just a light blue outline and white filling)  I did this in PICASA so you can play with it a little until the lettering looks transparent enough that you can't read it well without the decoder.